ubackup Documentation
Upgrading ubackup With IIS
To upgrade an existing ubackup on Windows with IIS, follow these simple steps.
In this upgrade walkthrough, we use C:\Sites\ubackup as the folder where the ubackup site is located and hosted by IIS.
Stop IIS Application Pool and Website
Make sure to stop both the ubackup application pool and the site using IIS Manager, so file and folders can be removed in the following step, as they are otherwise in use and can't be removed.
Remove Existing Site Files/Folders Except DataLocal
Remove all files and folders in C:\Sites\ubackup EXCEPT the DataLocal folder.
Download ubackup
Download the ubackup installation file from the following link and save it in folder C:\Sites\ubackup.
Download: Current Version
Unzip
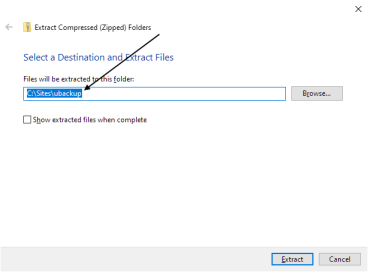
Using File Manager, right click on the downloaded file ubackup.zip (in C:\Sites\ubackup) and select "Extract All..." from the popup menu.
Make sure to extract into C:\Sites\ubackup, NOT C:\Sites\ubackup\ubackup.
Remove ZIP File
Once the ZIP file has been successfully extracted, remove the downloaded ubackup installation ZIP file from C:\Sites\ubackup. It is no longer required.
Start IIS Application Pool and Website
In IIS Manager, start the ubackup application pool and the site.
Access The ubackup Site
After completing the above steps, access your new site (showing the default installation, but you may have changed it):
http://localhost:1111
If all goes well, you will be greeted with the ubackup Home page.
If there is a problem, you may want to review the logs at C:\Sites\ubackup\logs.
Last Updated 03/02/2020 - (email)
ubackup.io © 2024 - Softel vdm, Inc.


